Introducing FlyWeb
For the past several months, a small team at Mozilla has been working on an experimental new Web API and an accompanying browser feature called FlyWeb.
What does it do?
In short, FlyWeb provides an API for web pages to host local web servers for exposing content and services to nearby browsers. It also adds the ability to discover and connect to nearby local web servers to the web browser itself. This feature allows users to find and connect to nearby devices with embedded web servers such as printers, thermostats and televisions as well as local web servers hosted in web pages via the FlyWeb API.
Enabling web pages to host local servers and providing the ability for the web browser to discover nearby servers opens up a whole new range of use cases for web apps. With FlyWeb, we can finally reach a level of richness in cross-device interactions previously only attainable via native apps. In addition, the built-in service discovery feature in the browser offers device makers and hobbyists a new way to leverage existing web technologies for users to interact with devices across all platforms.
Publishing a server from a web page
Here is an example that uses the FlyWeb API to create a server from a web page that responds with a simple “Hello FlyWeb” HTML document.
navigator
  .publishServer('Hello FlyWeb')
  .then(function(server) {
    server.onfetch = function(event) {
      var html = `
        <h1>Hello FlyWeb!</h1>
        <h3>You requested: ${ event.request.url }</h3>
      `;
      var options = {
        headers: { 'Content-Type': 'text/html' }
      };
      event.respondWith(new Response(html, options));
    };
  })
  .catch(function(error) {
    console.log('publishServer() failed :-(', error);
  });
The call to publishServer() returns a promise and opens a security prompt to the user asking for permission to create and advertise a local server. If accepted and the server publishes successfully, its promise resolves to a FlyWebPublishedServer object that contains an onfetch() callback that will be invoked any time a resource is requested from the HTTP server. The onfetch() callback expects a FlyWebFetchEvent argument which references a standard Request object that holds all the details of the HTTP request. If the user denies permission to create the server, the promise will be rejected.
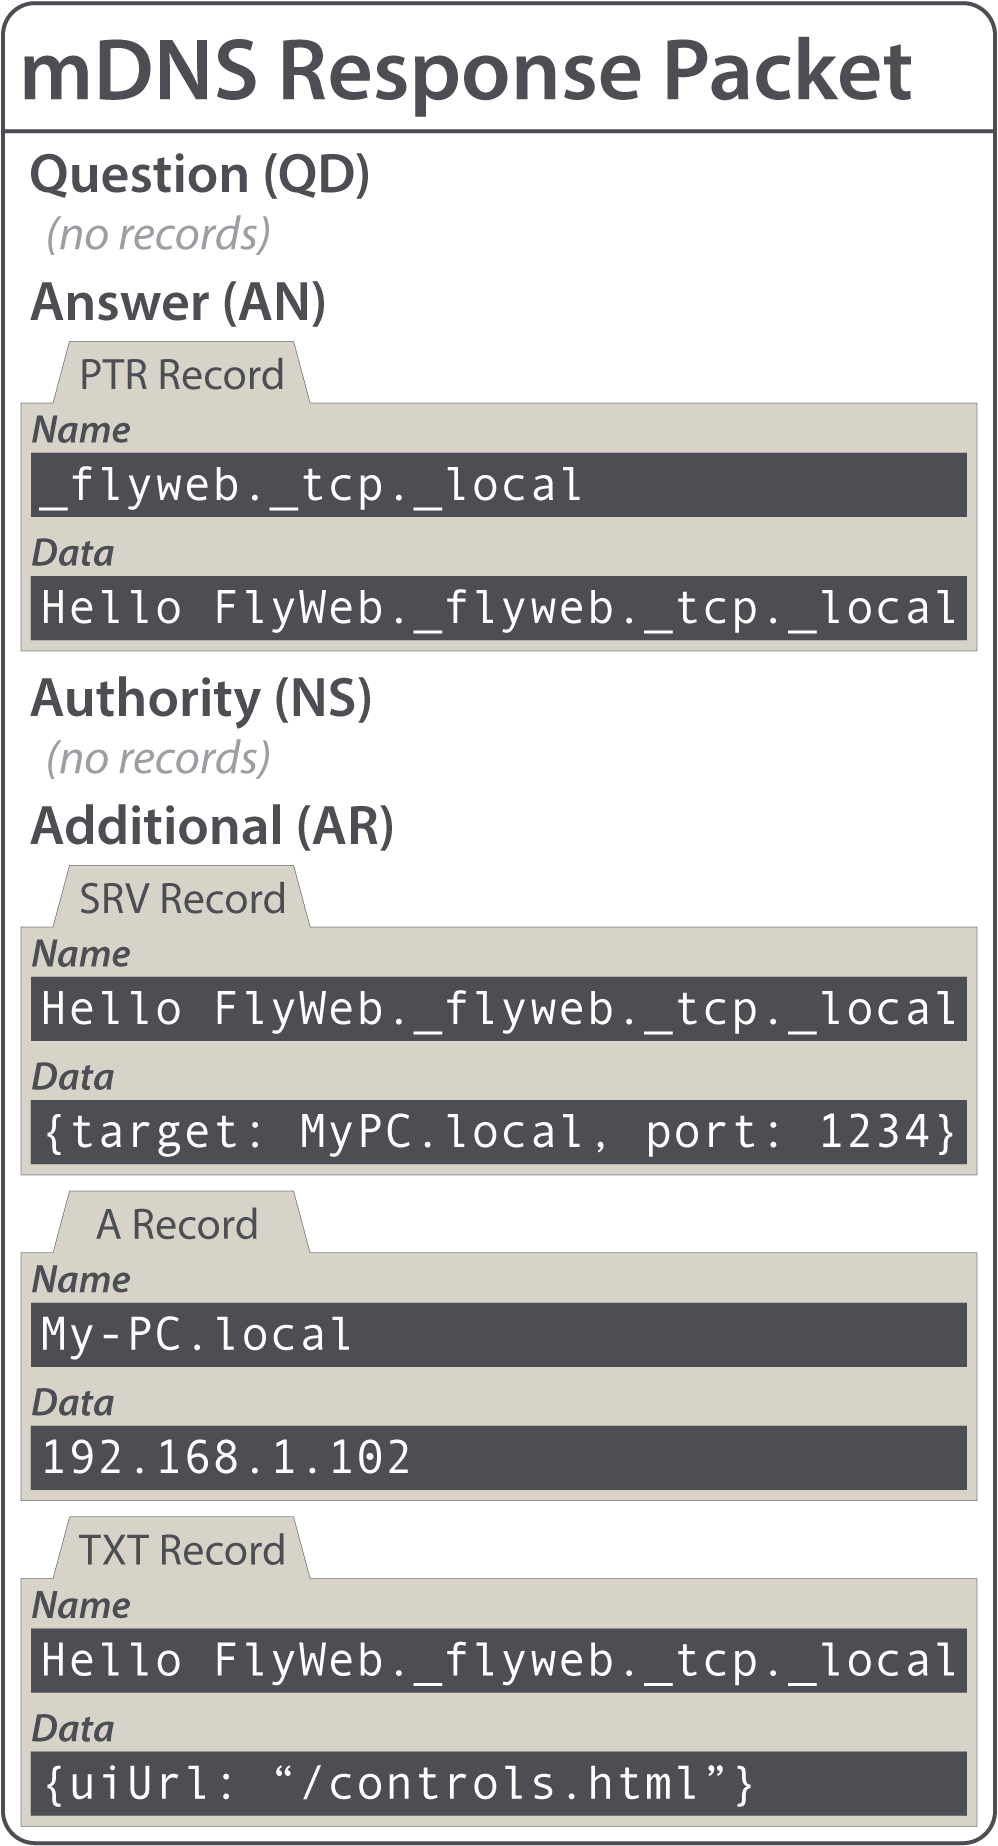
When the server gets published, an mDNS announcement is broadcast on the local network with the name specified in the call to publishServer(). The announcement is sent over the local network via UDP multicast on port 5353 and the mDNS packet is comprised of a PTR, SRV and A record as shown in the diagram below. The PTR record names the _flyweb._tcp service type and references an SRV record with the name of the service being advertised. The SRV record then references an A record by its target hostname and specifies the TCP port that the service is listening on. Lastly, the A record specifies the IPv4 address where the service can be reached. Optionally, a TXT record may be included to specify any additional metadata about the service such as the base URL where the service’s UI can be accessed. A TXT record may likely be used in future implementations for storing a key for handling encrypted connections.
Connecting to a FlyWeb service
As explained earlier, FlyWeb is comprised of not only a new API for publishing web servers, but also a user-facing feature in the browser for discovering and connecting to them. In the current implementation in Firefox Desktop, this feature can be found in a toolbar menu that reveals a list of nearby FlyWeb services for the user to choose from. In Firefox for Android, the FlyWeb menu item navigates the user to an about:flyweb page for displaying the same list of services in a mobile-friendly format.
Since FlyWeb is still an experimental API and feature, it is currently only available in Nightly and Developer Edition (Aurora) builds and it is required that the dom.flyweb.enabled pref be turned on under about:config. Note that Nightly builds may occasionally be broken or unstable, so Developer Edition (Aurora) builds are recommended.
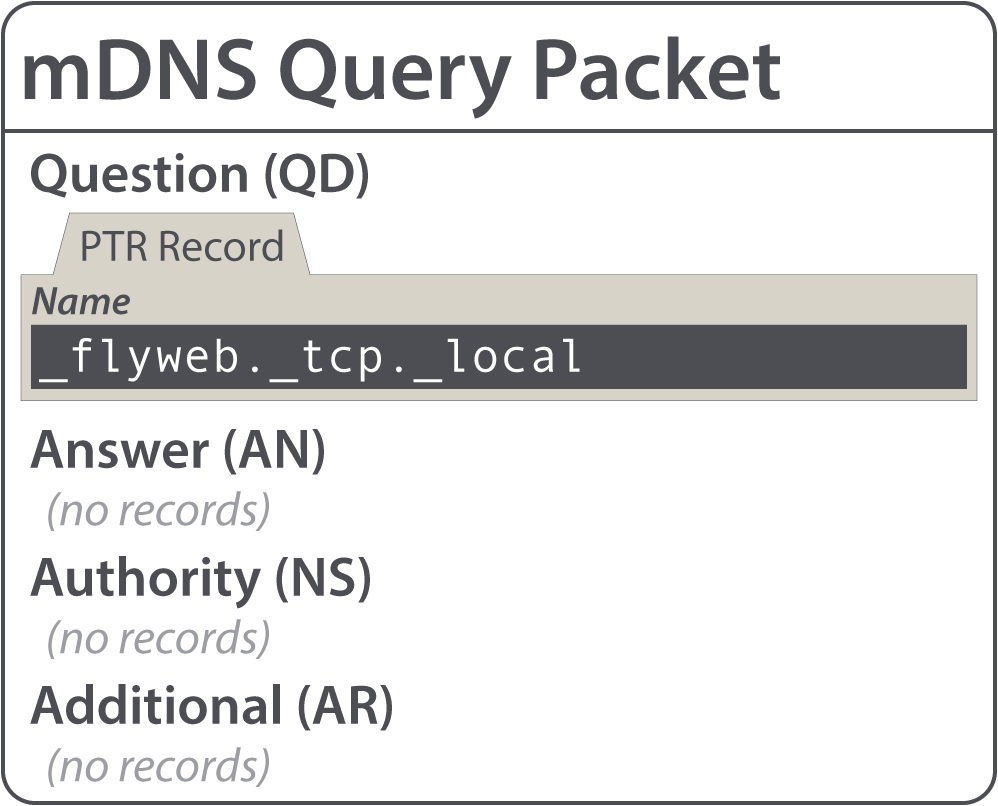
When populating the list of FlyWeb services, the browser broadcasts an mDNS query packet via UDP multicast on port 5353. All nearby clients advertising FlyWeb services will respond to this query packet with the same mDNS response packet they previously sent when they were first announced. The mDNS query packet for FlyWeb services will always be the same as seen in the diagram below. It simply contains a single PTR record that specifies the _flyweb._tcp.local service type.
When selecting a FlyWeb service to connect to, the browser generates a random UUID hostname for composing http:// URLs and a new browser tab is opened with a UUID-based URL that refers to the selected service. The primary reason for randomly generating a hostname like this is to prevent accidental or malicious sharing of origin-specific data such as cookies between two different FlyWeb services. Since FlyWeb enables users to connect to services on local networks, it could be possible to connect to two separate servers on two separate local networks that both share the same local private IP address (e.g. 192.168.1.2). By assigning a new random origin upon connection to a FlyWeb service, we can avoid data leakages between different servers that both operate under the same IP address when traveling between networks. In some existing mDNS implementations, _http._tcp services can be resolved via the .local pseudo-TLD using a hostname provided by the mDNS advertisement. However, this approach is still susceptible to the same potential data leakages if a server either accidentally or maliciously adopts a duplicate hostname of another previously-connected server.
So, in the example above, nearby clients would see a “Hello FlyWeb” service listed when opening the FlyWeb toolbar menu in their browsers. When the user selects it, a new tab is opened with a URL like http://f65e7350-883d-2e4c-8ad5-c275ceff96b2/ that renders a simple HTML response.
Serving other resources from a page
Its likely that you’ll want to serve up additional content from your FlyWeb server beside plain, simple HTML. No problem! Since the FlyWeb API relies on the same Request and Response objects found in Service Workers, your server can send any type of response body supported by the standard Response object from ordinary strings to Blob data. By using the Fetch API, we can load in remote resources for a FlyWeb server to respond with.
navigator
  .publishServer('Hello with a Logo')
  .then(function(server) {
    server.onfetch = function(event) {
      if (event.request.url === '/logo.jpg') {
        fetch('/assets/logo.jpg')
          .then(response => response.blob())
          .then(blob => event.respondWith(new Response(blob, {
            headers: { 'Content-Type': 'image/jpeg' }
          }));
        });
      } else {
        var html = `
          <h1>Hello FlyWeb!</h1>
          <img src="/logo.jpg" />
        `;
        var options = {
          headers: { 'Content-Type': 'text/html' }
        };
        event.respondWith(new Response(html, options));
      }
    };
  });
When an initial page is loaded for a FlyWeb service, all additional resources on that page can derive their URLs from the page’s UUID-based URL. Therefore, in the above example, the root HTTP request will respond with an HTML document that contains an <img> element which will fetch logo.jpg from the root of the same origin as the initial HTML document. Inside our onfetch() callback, we check for requests for that particular resource and then fetch the image remotely before responding with it. This type of HTTP request handling should seem familiar to anyone who has built server-side applications with the standard Node.js http module.
Advertising services from devices
Since FlyWeb is based on existing protocols like HTTP and mDNS, it is incredibly easy to build standalone services and devices that advertise themselves using it. By leveraging FlyWeb’s service discovery feature built-in to the browser UI, we can give device makers and tinkerers the ability to provide rich user interfaces for devices using familiar web technologies without relying on native platform-specific apps.
With the advent of IoT, hardware hacking has gained momentum in recent years with hobbyists everywhere. From the many iterations of the Raspberry Pi to the ultra low-cost ESP8266, there are no shortage of options to choose from when selecting a hardware platform. Fortunately, most of these hardware platforms already have existing implementations of HTTP servers and mDNS responders. Let’s take a brief look at what it would take to get a FlyWeb service up and running on some of these platforms.
Node.js on a Raspberry Pi
Since the Raspberry Pi is capable of running a Linux-based operating system, there are a wide variety of tools available for hosting an HTTP server along with an mDNS responder including Node.js, Python and Ruby. In this particular example, we’re going to use Node.js to advertise our simple “Hello FlyWeb” service. Also, keep in mind that this example is not written to work exclusively on the Raspberry Pi. Nearly any platform that is capable of hosting a Node.js environment, including a laptop computer, should be able to run it.
To update Raspbian with the latest version of Node.js from the NodeSource PPA, run the following commands:
sudo apt-get update
sudo apt-get upgrade
sudo apt-get remove nodejs
curl -sL https://deb.nodesource.com/setup_6.x | sudo -E bash -
sudo apt-get install nodejs
In our example, we are going to use the mdns NPM package so that we can advertise mDNS services through Avahi in Node.js. Before you can install the mdns package from NPM, you will need to have the libavahi-compat-libdnssd-dev package installed. To install these packages, simply run:
sudo apt-get install libavahi-compat-libdnssd-dev
sudo npm install -g mdns
Note that the libavahi-compat-libdnssd-dev package provides Avahi headers for Apple Bonjour compatibility. This is required since the mdns package utilizes the Apple Bonjour API directly. Because of that, this Node.js example can also run on macOS/OS X systems by simply installing the mdns package from NPM. This example will also run on Windows systems provided that Apple Bonjour is installed. See the mdns README for more information.
var http = require('http');
var mdns = require('mdns');

var server = http.createServer(function(request, response) {
  var html = `
    <h1>Hello FlyWeb from Node.js!</h1>
    <h3>You requested: ${ request.url }</h3>
  `;
  var options = {
    headers: { 'Content-Type': 'text/html' }
  };
  response.writeHead(200, options);
  response.end(html);
});

server.listen(3030, function() {
  var advertisement = mdns.createAdvertisement(
    mdns.tcp('flyweb'), 3030, { name: 'Hello FlyWeb' }
  );
  advertisement.start();
});
As you can see, this is just a very simple Node.js web server using the standard http module. The only additional bit of magic required to make this service discoverable by the FlyWeb UI in the browser is the mDNS advertisement. Using the mdns module, we wait until the HTTP server is listening, then we create an mDNS advertisement with a _flyweb._tcp service type. We also specify the port that the HTTP server is listening on as well as the name we want to display to the user when they discover it in the browser. In this case, we are listening on port 3030, but this value is arbitrary and it can be any port you like.
Embedded HTTP server for ESP8266
The ESP8266 Wi-Fi chip has become one of the more popular pieces of hardware among IoT enthusiasts and for good reasons. For under $5 USD, it includes a full TCP/IP stack, 802.11b/g/n Wi-Fi with WEP and WPA/WPA2 support, a 32-bit RISC CPU, 1MB built-in flash memory and 16 GPIO pins. It is possible to build fully-functional IoT devices with the ESP8266 without any additional CPUs or microcontrollers. Programming a device like this in C++ is much closer to the hardware and therefore, the same example requires a bit of additional boilerplate code.
#include <ESP8266WiFi.h>
#include <ESP8266WebServer.h>
#include <ESP8266mDNS.h>

ESP8266WebServer server(80);

void handleRequest() {
  String html = "<h1>Hello FlyWeb from ESP8266!</h1>";
  server.send(200, "text/html", html);
}

void setup() {
  String accessPointName = "FlyWeb AP";
  WiFi.mode(WIFI_AP);
  WiFi.softAP(accessPointName.c_str());
  server.on("/", handleRequest);
  server.begin();
  MDNS.begin("Hello FlyWeb");
  MDNS.addService("flyweb", "tcp", 80);
}

void loop() {
  server.handleClient();
}
One important distinction between this ESP8266 example compared to the others is that this example will create an open Wi-Fi access point automatically instead of joining an existing network. Even though this device can easily be programmed to join an existing network, by starting off in access point mode we can explore a particularly interesting use case.
Typically, IoT devices built around the ESP8266 are “headless” which means they do not have access to any display or output device. This poses a difficult problem since the device needs to be connected to an existing Wi-Fi network to be useful. One possible workaround is to start a new open Wi-Fi access point like the above example, but instead of serving up the device’s normal web interface, we can render a list of nearby Wi-Fi networks and allow the user to configure the device to join their existing wireless network. The device could also advertise this “ESP8266 Config” service via FlyWeb which would enable the user to simply connect to the open Wi-Fi network, select the “ESP8266 Config” service from the FlyWeb toolbar menu in their browser and configure the device. Once configured, the device could automatically join the existing Wi-Fi network and the user can easily discover and connect to it via FlyWeb in their web browser without any additional steps.
Potential use cases
Once you’ve grasped the concept of what FlyWeb is, it doesn’t take too long before you begin imagining some of the interesting use cases it enables. Whether you are a front-end web developer looking to push the limits of what is possible in the browser or an IoT hardware hacker in search of an easy way to provide user interfaces for your devices, FlyWeb opens up a whole new world of possibilities.
- Offline peer-to-peer multiplayer gaming
- Touch-screen controlled quadcopter drones
- Cross-platform local network file sharing
- Discoverable “smart home” devices (e.g. thermostats, TVs)
Where do we go from here?
As mentioned earlier, an initial “version 0” implementation has landed in Firefox Nightly and Firefox Developer Edition (Aurora) with the dom.flyweb.enabled preference disabled by default. Our implementation is currently undergoing a security review to ensure that it is not introducing any new exploitable vulnerabilities before including it in the other release channels.
A team has also been exploring commercial opportunities for FlyWeb revolving around consumer hardware products. From a technical perspective, we would also like to explore the potential to utilize Bluetooth as a transport layer. We believe that Bluetooth could expand the scope for use cases we’ve already identified and may also enable additional use cases that aren’t possible with the current implementation.
Lastly, we’d like to begin having discussions with other browser vendors. We strongly believe that FlyWeb fits in as a natural extension of the web platform and could pave the way for a whole new generation of web apps that weren’t previously possible. Because of this, we would love to see widespread adoption from other browsers to help propel FlyWeb forward as a new web standard.